Showing posts with label tortilla. Show all posts

Sunday, April 3, 2011

Homemade Chimichangas

Thomas' brother's family got us a cookbook for Christmas called Fabulous Freezer Meals. The author, Jenny Ahlstrom Stanger, provides all sorts of recipes based on pre-made meal "building blocks" you can cook and store in advance, like taco meat or spaghetti sauce. I personally can't wait to try some of the recipes the ice cream cake section...

Anyway, we recently adapted her recipe for chimichangas. They turned out awesome, and they freeze pretty well, so if you feel like cooking a ton of them, you can easily have several meals from it.

Chimichangas
1 lb ground beef
about 1/2 a medium onion
1 regular can refried beans OR whole pinto beans
shredded cheese (about 1 cup)
about 8 flour tortillas
vegetable oil
  1. Heat onions in a frying pan (in a little bit of oil). Add beef. Season to taste, using salt, pepper, cumin, garlic powder, etc.
  2. Once beef is browned, drain and cool for a few minutes.
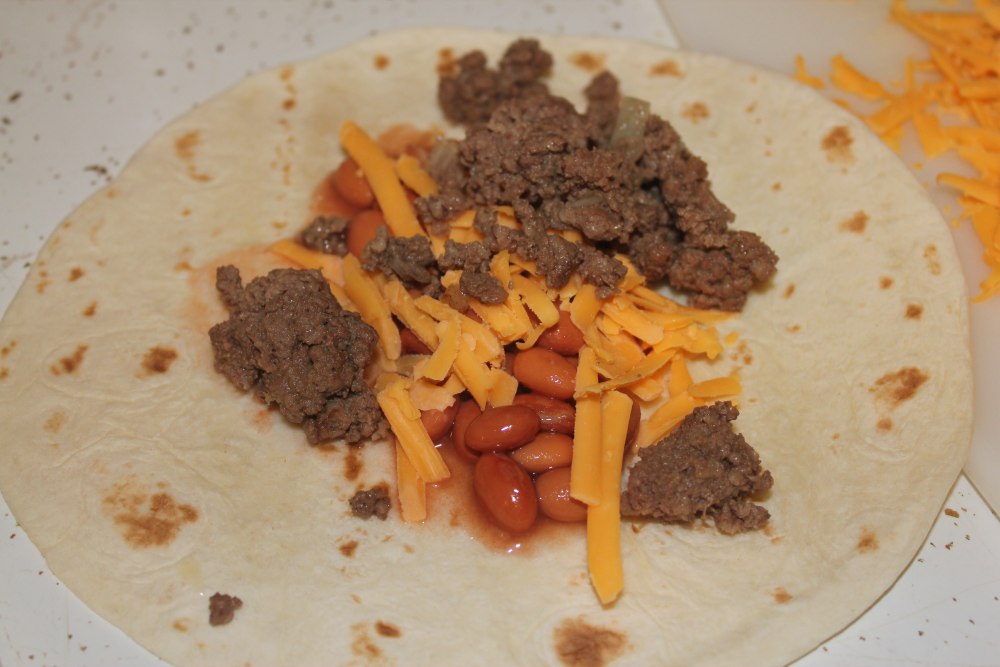
  3. Build chimichangas one at a time by placing a little bit of the beef, a spoonful of the beans, and some cheese in the center of a flour tortilla.
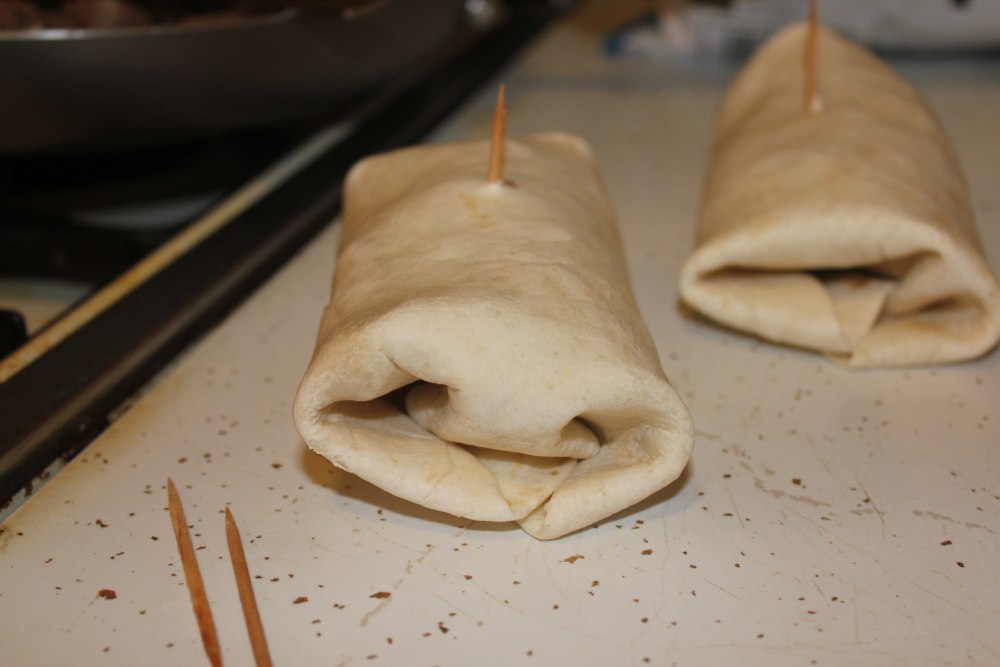
  4. Roll chimichangas, folding two sides in for the "ends" and then folding the rest in on itself. Secure with a toothpick.
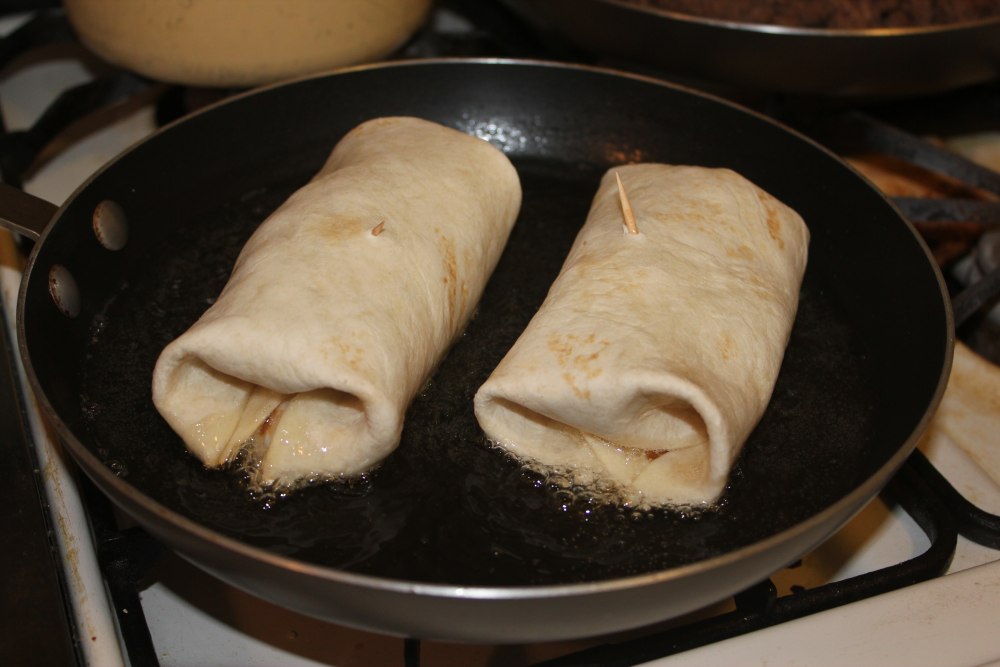
  5. Heat some vegetable oil in a small frying pan, enough that you have about 1/4 inch of oil in the bottom. 
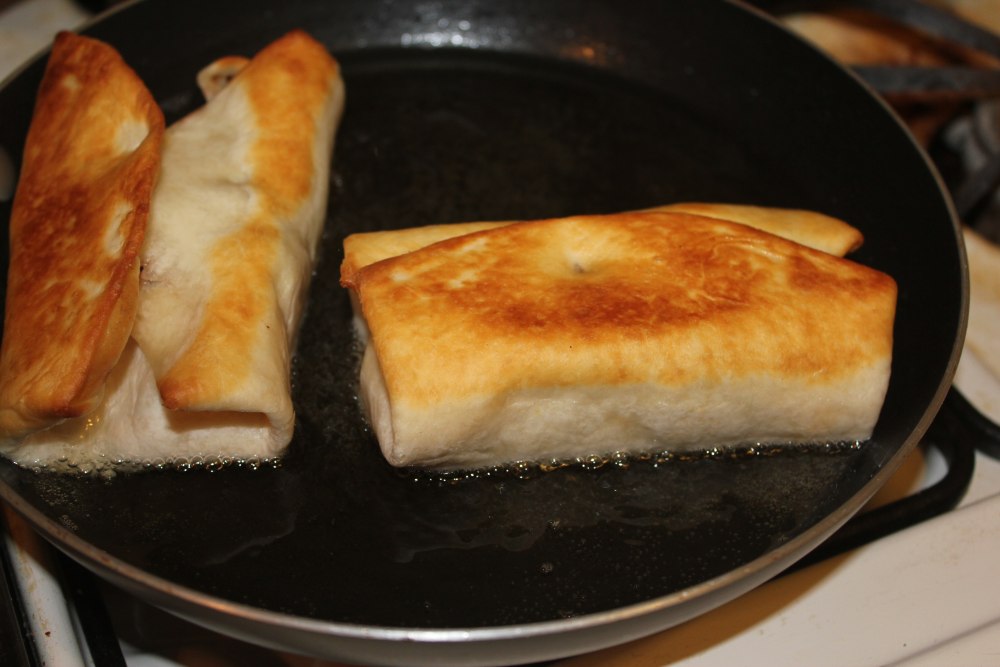
  6. Place chimichangas (we did two at a time) seam-side down in the hot oil. After it cooks for a few minutes, the tortilla will be golden brown and it should stay (mostly) closed. At this point, flip the chimichanga in the oil using tongs and/or other utensils, very carefully.
  7. Once brown on both sides, transfer to a plate covered with a paper towel to drain the oil.


    Sunday, October 10, 2010

    Tuna Taco Things

    What do you do with this combination of ingredients? See below for my solution!
     As a senior in high school, my class schedule was such that I could go home for the day after lunch. Thus, I typically did not bring a lunch to school, but instead ate upon arriving home.

    This gave me an opportunity to experiment with my cooking. One of my experimental recipes from back then has made its debut here at the Bradshaw residence. Try it for yourself, and please let me know what you think!

    Tuna Taco Things

    corn tortillas (3-4)
    1 can tuna in water
    about 2-3 Tbsp. mayonnaise
    1/4 cup frozen mixed vegetables (corn/peas/carrots/green beans)
    cheese of your choice, sliced into strips: cheddar or Monterey Jack work well
    spices, to taste: I add salt, pepper, garlic (the usual)

    1. Drain tuna. Put in bowl along with mayonnaise and selected spices. Mix together with a fork.
    2. Boil/otherwise heat frozen vegetables. Drain and add to tuna mixture. You may choose to add a bit more mayonnaise for the right balance/texture.
    3. Heat tortillas in a frying pan with a little oil. Flip at least once, then place a strip of cheese into the center and fold tortilla with a spatula. Let cheese begin to melt, then set aside and continue with the remaining tortillas.
    4. Spoon tuna mixture into tortilla shells.
    5. Enjoy!


    oxox

    Tuesday, September 28, 2010

    Enchiladas à la Lisa

    (at the bottom, it will say that this was posted by Thomas, but don't believe it. This is Lisa posting.) ;o)


    When I first moved out to Utah two years ago for school, I had this ongoing list in my head of "Top 10 Single College-Student Dinners." Unfortunately, I did not write it down, but (for me at least) it included Little Caesar's $5 pepperoni pizzas, Top Ramen with frozen veggies, and beef enchiladas.

    This weekend I had the opportunity to roll some yummy enchiladas for a little former-roommate party at our apartment. Thomas encouraged me to take some photos, so here you are:

    Enchiladas

    1 can red enchilada sauce (I used the large can of Las Palmas Enchilada Sauce this time, but Old El Paso would be my top choice)
    1 small onion, diced
    1 Tbsp. or so of oil
    ground beef (you need about 1 lb if using the small can of sauce; I used about 2 lbs with the large can)
    spices of your choice; I like some garlic, salt, pepper.
    small corn tortillas (about 15, for the larger can of sauce)
    approx. 1 1/2 cups of grated cheese (I prefer Monterey Jack)

    1. Heat a small amount of oil in a frying pan. Add onion pieces and let them cook and soften for a few minutes.
    2. Add ground beef. Season to your liking and allow to brown.
    3. Once cooked, drain your meat.
    4. To the cooked, drained beef, add about half of the can of enchilada sauce and about half of the grated cheese.
    5. Spoon a bit of this mixture into a corn tortilla**. Roll it up and place it with the overlap down into a lightly greased baking dish. If you use the large can of sauce, like I did, you'll need a 9*13 plus a 9*9. 
    6. Continue filling tortillas and placing them in your baking dish until your filling runs out.
    7. Pour the remaining enchilada sauce over the rolled enchiladas. Use a spoon or other utensil to ensure the sauce covers as much of the exposed tortillas as possible, as this will reduce dryness. Top with the rest of your cheese.
    8. Bake for 30 minutes at 350°. Serve with your favorite salsa or guacamole, and perhaps some rice or refried beans!

    **Depending on the corn tortillas you are using, you may notice that after sitting in the pan for a moment, they will crack along the top. To remedy this, it is helpful to take individual tortillas, place them into a damp paper towel, and microwave for about 12 seconds before filling and rolling. I used La Banderita brand tortillas this time and did not find this step necessary.


    Happy cooking! oxox

    Sunday, July 25, 2010

    Camp Cuisine

    After a weekend of camping, we thought we'd share our thoughts on the camp food we brought. It's that time of year, so if you haven't yet, get outside and enjoy the wilderness!!

    Although we only actually built one campfire over the course of our trip, here's a photo of the campfire ring we improved at our campsite:


    The two rocks that stick out awkwardly (at the bottom and right of this photo) are flat on top - perfect to use as "counter space" when cooking outdoors. We put these to use even when we cooked on our camp stove. Following are meal ideas and a few recipes we really used this weekend.

    Breakfast

    For breakfast on the first morning, we brought a couple flour tortillas, some pre-cooked turkey sausage, a few tomatoes, and some eggs to assemble into breakfast burritos.


    The eggs were somewhat challenging to bring in, but they were tasty nonetheless. We neglected to put any sort of oil or grease in the pan, which made for an... interesting... cleanup process, so if you try this one out, please be more wise than we were.

    The other mornings, we kept it simple with instant oatmeal. At Walmart, we picked up a box of the generic brand flavored stuff. We chose the "fruit and cream" variety box. It worked out pretty well.

    Unfortunately, the gas for our camp stove ran out about halfway through the trip, and the second canister we'd brought along was not the correct size. This meant that the oatmeal we ate, we ate cold. However, we did not find this to be too big of a problem.

    Lunch

    We only ate two lunches out in the woods. The first day we dined on Maruchan Instant Lunch - the ones in the foam cups. They're inexpensive at 28 cents each, but I think they work out pretty well! I chose the shrimp flavored one and Thomas had the hot & spicy chicken one (and let me tell you - they don't lie about it being hot and spicy!).

    The second day we had Uncle Ben's packaged rice thingies. These were ok, but we wouldn't recommend them. We were consoled in that we got them for cheap - Thomas got a coupon for one for free and another coupon for some amount off so we picked up two. All in all, the flavor was peculiar and we actually ended up tossing some of it.

    Dinner

    Dinner number one was a campfire favorite: foil dinners! Due to some hiking troubles we got in late and were unable to build a campfire, so we cooked ours on the camp stove.

    Foil dinners are great because you put everything together and then just let it all cook. You almost can't mess them up! We used cut-up potatoes, baby carrots, and Italian sausage in ours and wrapped it all up in foil. I added some salt, pepper, rosemary, and Worcestershire sauce and they turned out pretty well. One thing I didn't do that I wish I had is to put the ready-to-cook meals in their own Ziploc bags. Instead, I put them into a grocery sack... and they ended up leaking liquid.

    On the second night, we built a campfire in which to cook foil-wrapped potatoes. We supplemented them with a can of chili we heated on our camp stove. For a simple and fast dinner, it was pretty tasty and quite filling.

    Dinner number three was fabulous: Thomas has sold me on Mountain House meals. They are freeze-dried and delicious! Because by this point we were unable to use the stove (as mentioned above), we tried a new method for heating our filtered water: we filled up our kettle and let it sit in the tent during the afternoon. This actually worked pretty well!

    We'd purchased the Lasagna with Meat Sauce entree for 2 - and preparation consisted of pouring water into the bag, sealing it, and letting it sit for a few minutes. It was really tasty! These pouches tend to be a little pricey, but they're worth every penny. We ended up using both pouches because, well, we were hungry and it was so good.


    Dessert

    We didn't have time (or light) for dessert the first night, so we ate what we'd brought for that night on the second night. I first made these orange-peel chocolate muffins at Girls' Camp when I was 14 or 15, and I think they're cool - and yummy.

    All you do is put chocolate muffin mix (prepared according to the recipe or box instructions) into half an orange peel. We used Jiffy Chocolate Muffin mix, which I believe called for an egg and water. We brought half of what was in the box and added an egg and some water in a Ziploc bag. After slicing 2 oranges in half and scraping out the fruit flesh (which we then ate), we cut a corner of the Ziploc to facilitate squeezing the batter into the orange halves. Then we wrapped them in foil and cooked them in the campfire. They cooked pretty quickly. I love these because the muffins pick up some of the flavor of the oranges!


    Our final camping dessert was Instant Jello Pudding. This requires just cold milk - which is fine, unless you're (tent) camping, right? Well, we solved that last little issue by adding some powdered milk to the pudding mix. Due to some unclear conversion information on the milk package, we added a bit too much water.... but it tasted fine anyway.


    Do any of our readers have favorite camping recipes?? Feel free to comment!!

    oxox
    Sunday, January 3, 2010

    Bradshaw Taqueria ?

    Thomas bragged on these burritos for months before I finally got to try them! We first made them together about 2 months ago and while I must admit I was skeptical at first, this is now probably one of my favorite recipes. We made these together a second time while visiting my family over Christmas vacation.

    The Swiss cheese was the ingredient I shied away from the most at the beginning. I love cheese, but Swiss has never been a favorite of mine. It works pretty well with the other ingredients, though, so I'd definitely recommend it. Additionally, the bean/tomato sauce process does seem kinda strange the first time. But trust me, it's worth it!!!

    Thomas' Burritos

    Tortilla ingredients:
    1 part vegetable oil (we used 1 1/2 c oil/milk/water to make 15 tortillas)
    1 part milk
    1 part water
    flour
    1. Begin by mixing equal parts oil, milk, and water. Add flour and continue to mix until batter becomes a thick consistency.


    2. Keep adding flour, kneading until mixture becomes doughy.


    3. Separate dough into small balls. They should fit in your cupped hand.


    4. Roll out the dough. Try for somewhat round and very thin tortillas. They shrink up and thicken a bit in the pan.


    5. Sprinkle a bit of salt into a heated frying pan. Transfer one tortilla into the frying pan. As it cooks, the color will change slightly. Once the bottom is thicker and a more golden color, use a spatula, or if you're like Thomas, your hands, to flip it over and cook the other side.

    6. Stack cooked tortillas until filling is ready!


    Beans:
    2 cans Cannellini beans (White Kidney beans)
    1 small (8-0z) can tomato sauce
    spices: cumin, thyme, basil, salt to taste

    1. Drain beans. Combine beans and tomato sauce in a saucepan. Save one bean can; remove label and wash.


    2. Drain off a bit of the tomato sauce and use the clean can to mash the beans.


    3. Add spices to taste. Thomas likes a lot of cumin.

    4. Cook bean mixture on the stovetop until heated.

    Other ingredients:
    1 green bell pepper, chopped
    2 tomatoes, diced
    grated Swiss cheese
    sour cream


    To assemble:
    Begin with a tortilla. Spread on a bit of the bean mixture and some sour cream. Add grated Swiss cheese and sprinkle in a few tomatoes and peppers. fold bottom up and sides around. ENJOY!!